QTP - How to set/get system time and date?

QTP allows running different types of test. And sometimes, it needs perform time and date manipulations on a computer. In this article, I will show and explain - how to get system time/date and change them.

Actually, today's lecture consists of two questions:
  1. How to get system time and date?
  2. How to set system time and date?
Let start training right now :)
So, the first section is:


How to get system time and date?


Actually, this is not difficult task! Use the following functions:
  • Now - function returns the current date and time according to the setting of your computer's system date and time.
  • Date - function returns the current system date.
  • Time - function returns a Variant of subtype Date indicating the current system time.
So, the code is very simple. I provide it with a screen shot containing results:


Well, let's deal with the second section:


How to set system time and date?

For that, I will use simple DOS commands:
  • time - this command displays or sets the system time:
    To change the time, pass it as a parameter to time command. See the above screen shot as an example.

  • date - this command displays or sets the system date:
    To change the date, pass it as a parameter to date command. See the above screen shot as an example for date manipulations :)
Now, I will combine all the above VBScript functions (Now, Date, Time) and DOC commands (time and date):

As you can see, initial date and time were '26.10.2007 22:45:10'. Then I added 3 days and 2 hours to initial date & time. The result of addition is - '30.10.2007 0:45:10'.

By the way, could you guess, why the result day is 30th, not 29th? :) To answer, please pay attention that we added 2 hours too :)

The last step - running of time and date commands from command line. I used Run method of WScript.Shell object.


So, as you can see - date and time manipulation is easy enough.


Related articles:

How to organize user-defined functions into LoadRunner library?

Assume, you work and work in LoadRunner, create and create scripts.
Eventually, you face the situation when your code is duplicated in many scripts. This is a wrong way! Take my word for it :)

I will show - why it is and how to struggle against it.

Duplicated code is an evil, because:
  • If you fix/modify a duplicated code, you have to edit each occurrence of this code.
  • It needs add debug messages into duplicated code, you have to add debug functions into each occurrence of this code.
  • If you decide to change the algorithm, implemented in a duplicated code, you are reluctant to find and edit it in each occurrence of this code.
If you have tens or hundreds VuGen tests, containing diplicated code, the support can become a nightmare. Rework will cost too much!!! You must avoid it from the beginning.


Well, what to do?

You have create a user-defined library. It needs place your code into separate h-file.

Let's assume, we will use the following function:
sum(1, 4, -3)
which calculates a sum of arguments. It's easy :)

In LoadRunner VuGen, create new file and write this code:
  1. #ifndef _AR_H_
  2. #define _AR_H_

  3. int sum(int nArg1, int nArg2, int nArg3)
  4. {
  5.     return nArg1 + nArg2 + nArg3;
  6. }

  7. #endif // _AR_H_

Save it as "ar.h" into "Mercury\LoadRunner\include" folder. Actually, the name of file can be any. Out library will perform arithmetic operations (sum :) ), that's why I named the file as
"ar.h".

Your library file is created! To include it, use #include preprocessing directive in Action:
#include "ar.h"

Hint: If your file is not located in a default include folder ("Mercury\LoadRunner\include"), you have to specify full path, for example:
#include "c:\\work\\projects\\include\\ar.h"

Hint: Since you deal with C language, you have to use double backslash inside of path.

That's all! Run your Action and enjoy:
As you see, our function Sum works correctly.


Now, I will answer ans show the following question:

How to process global variables in LoadRunner VuGen script?

Modify our "ar.h" from "Mercury\LoadRunner\include" folder:
  1. #ifndef _AR_H_
  2. #define _AR_H_

  3. int nGlobalValue = 0;

  4. int sum(int nArg1, int nArg2, int nArg3)
  5. {
  6.     return nArg1 + nArg2 + nArg3;
  7. }

  8. #endif // _AR_H_

Then, modify Action like this:

And add a second action ("Action2") to our script:
Note, that we added #include too.

Hint: By the way, the script will work correctly even if you didn't add #include for second action. Nevertheless, I recommend to add this preprocessing.

Execute our updated VuGen script, containing two actions:
As you can see, variable, located in h-file, is shared between actions. It saves his values between actions.
In other words, variable, located in h-file, is a global variable. It can be used for LoadRunner actions communicating.

I hope, library of user-defined functions will simplify your scripts and decrease efforts for their maintenance. As a result, it will save your time and increase your performance :)

LoadRunner VuGen scripting - How to automatically download file from server and save it to local disk?


In my previous article, "How to record a file saving, performed by user from browser page?", I shown that user's activities are not recorded by LoadRunner. This is a rule!

LoadRunner records file transferring from server and does not record file saving.

What to do, if you have to save transferred file to local disk?
Continue reading, and you will get the solution :)

So, Let's start.
You can download file from a server with the web_url function.
See an example:

Image downloading:
  1. web_url("logo.gif",
  2.     "URL=http://www.google.com/intl/en_ALL/images/logo.gif",
  3.     "Resource=1",
  4.     "RecContentType=image/gif",
  5.     "Snapshot=t1.inf",
  6.     LAST);


This code downloads Google's logo image:

To save this image as file to local disk, we have to perform these steps:
  1. Capture image from server's response
  2. Save captured data to local disk

How to capture image from server's response?

Use web_reg_save_param function with the following boundaries - "LB=\r\n\r\n", "RB=". These boundaries allows to capture the whole data from a body of server's response. Function will look like:
    web_reg_save_param("prmLogoImage", "LB=\r\n\r\n", "RB=", LAST);

This function should be placed before web_url function. After execution, prmLogoImage parameter will contain GIF-file.

I will clarify briefly the meaning of boundaries - "LB=\r\n\r\n" and "RB=".
Please, read the basic concepts of HTTP protocol, read Request message section:

HTTP response consists of the following:
  • Headers, such as HTTP/1.1 200 OK or Content-Length: 3473
  • An empty line
  • A message body, containg text of requested page or file
So, Header and Message body should be separated by empty line.
First CRLF (that is, a carriage return (CR = "\r") followed by a line feed (LF = "\n")) ends last header, and second CRLF ( = "\r\n") creates empty line. All data, followed by second CRLF, are treated as message body.
To summurize - "LB=\r\n\r\n" says "start capturing from the beginning of message body", empty right boundary "RB=" says "capture data till the end of message".

Open LoadRunner and enable logging of data, returned by server:

Then execute script containing initial web_url function, and open Replay log:
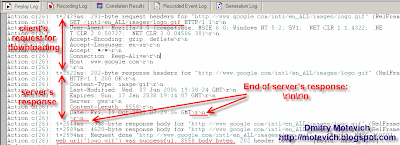
As you see, Replay log contains "\r\n\r\n" at the end of server's response.
Also, pay attention, that server returns the length of file to be downloaded (Content-Length: 8558).


Save captured data to local disk
Saving captured binary data (in our case, GIF file) requires additional step - we have to determine the length (= size) of captured data.

Tips: The simplest way - strlen function - is not correct. Imagine, that that captured data contains embedded NULL characters ('\0'):
"123\0qwe"
The real size of captured data = 7 bytes ('1', '2', '3', '\0', 'q', 'w', 'e').
But strlen function will return value 3, because it counts bytes before the first NULL character ('\0').

To calculate size of captured data use lr_eval_string_ext function:
    lr_eval_string_ext ("{prmLogoImage}", strlen("{prmLogoImage}") /* = 14*/, &szBuf, &nLength, 0, 0,-1);

lr_eval_string_ext function copies captured data into szBuf array and places a size of captured data into nLength variable. That's easy, I hope :) If not, Help will help :)

Tips: There is another way to get known the size of file to be downloaded. Remember, that server returned the length of file (Content-Length: 8558). So, you can extract this value using Correlation.


And the last action is to save binary data from szBuf array into a local file. I used standard fwrite function from C programming language:
    fwrite(szBuf, len, 1, hFile);

Well, please see the whole source code:

Click the block to expand the source code:
  1. int WriteDataToFile(char *szFileName, const char *szBuf, int len)
  2. {
  3.     int hFile;

  4.     hFile = fopen(szFileName,"wb");
  5. .....


Execute the source code, and you will see, that new file will be created and saved automatically - "C:\LogoImage.gif". And this is what we needed - Google's logo image.
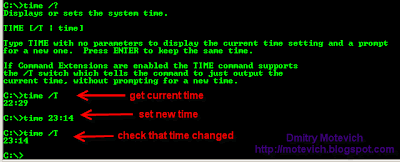
LoadRunner - How to record a file saving, performed by user from browser page?

The problem:

This is a frequently asked question - why file downloading from a browser page (right mouse click, then "Save Target As...") was not recorded in LoadRunner VuGen script?

The difference between functional and load testing:
Actually, LoadRunner records a file transferring only, not downloading!
This is the principal difference between functional and load testing! I will describe it.


Functional testing is done from a user's viewpoint.
What does a user see? It sees windows, dialogs, UI cotrols.
For example, user can see downloaded html-page in a browser, or as plain text in a telnet session.
In this case, data transferring is the same (HTTP protocol), while data representation varies (browser or telnet session).

LoadRunner performs Load testing, i.e. it records and emulates data transferring between client and server. Data transferring only, not data displaying for user!
For the above example, html-page can be downloaded directly from web-server. Another variant - page can be downloaded from FTP-server (even using Secured FTP protocol - FTPS), and then data will be passed to browser. User will see the same page.
In this case, data representation is the same (browser page), while data transferring varies (HTTP or FTPS protocols).

So, remember the simple rule:

LoadRunner does not record client side activities!

Tips: That's why LoadRunner does not show browser windows during load testing.
Note: Please, do not tell me, that VuGen shows Run-Time Viewer during replay :)
The run-time viewer was developed specifically for script debugging. There is no dependency between data representations in Run-Time Viewer and in a real browser (for detailed info read Mercury Support Knowledge Base (http://kb-web.mercury.com, requires login), topic 14094 "What are the limitations of the Run-Time Viewer").

And that's why it is impossible to record a mentioned file downloading (
right mouse click, then menu item "Save Target As...") . The answer is simple - this is not a load testing :)
To perform this action, use functional testing tools - QTP, SilkTest, Selenium, and others.

Using Correlation in LoadRunner scripts - visual tutorial

Today, I will explain - what is LoadRunner correlation and how to perform it.
In my humble opinion, correlation is the key concept of LoadRunner. So, strong understanding of correlation is mandatory requirement for any test engineer, if he plans to be LoadRunner professional or even guru :)


Example from a real practice:


I recorded LoadRunner script for a web server, which contained two special fields - timestamp and checksum:

web_submit_data("rms.jsp",
    "Action=http://eprumossd0010:8400/RMS/jsp/rms.jsp",
    "Method=POST",
    "RecContentType=text/html",
    "Referer=http://eprumossd0010:8400/RMS/html/testFramework.html",
    "Snapshot=t4.inf",
    "Mode=HTML",
    ITEMDATA,
    "Name=TIMESTAMP", "Value=1192177661211", ENDITEM,
    "Name=CHECKSUM", "Value=715E19300D670ED77773BBF066DAAAE2866484B8", ENDITEM,
    // others parameters ...
    LAST);

Every time a client web browser connects to web server, server gets current time stamp, calculates checksum and sends them to client. These two fields are used to identify a current session. In other words, the pair of timestamp+checksum is analog of session ID.

The scheme of this interaction is the following:


Where is the problem? Let's replay the recorded LR script.

The problem occurs when I try to execute my recorded script.
Web server checks its current time with a time stamp, sent by client. If client's data is out-of-date or incorrect, then server returns an error:

The parameter "CHECKSUM" is not found or has invalid value.

There is the scheme for this interaction:

Client cannot re-use old (i.e. hard-coded) values for times tamp and checksum. It must request new data.
So, instead of hard-coded values, LR script should process dynamic data, returned from server. This can be done using a correlation:


The definition of correlation is:
Correlation is the capturing of dynamic values passed from the server to the client.


Correlation can be done with 2 ways:
  1. Automatically
  2. Manually
I will describe auto-correlation in the future posts. For now, I can say that this is not ideal solution. Sometimes, it does not work, or works incorrectly.

Manual correlation is a choice of real LoadRunner engineer. It's a kind of "must have" knowledge!
Well, let's start investigating a manual correlation.

The algorithm of manual correlation is the following:
  1. Find a dynamic value to capture.
  2. Find server's response, containing the dynamic value.
  3. Capture the dynamic value.
    Special parameter will be used instead of dynamic value.
  4. Replace every occurrence of dynamic value in script with the parameter.
  5. Check changes.
Now, I will describe each step in details:
  1. Find a dynamic value to capture
    I recommend to record and save two equal VuGen scripts. After that, open menu item "Tools / Compare with Scripts..." and you can compare both recorded scripts in WDiff:
    The differences are highlighted by yellow. This highlighting means that lines (parameters values) change from run to run. So, most probably, these values should be correlated.

    Tips: Sometimes, comparing of two scripts cannot detect dynamic values. Imagine, that you recorded this script:
        "Name=SessionID", "Value=A38E9002A41", ENDITEM,
        "Name=CurrentMonthID", "Value=4", ENDITEM,
        ...
    It's obvious, that SessionID should be correlated. What about CurrentMonthID parameter? Second recorded script can contain "Value=4" too. And it's possible, that your script will work correctly during the April (4th month is April), and will not work from 1st May! So, be careful, my dear reader :)

    Tips:
    Look through the source code of recorded script. Timestamp, CheckSum, SessionID, and different IDs - all of they are potential candidates to be correlated.

    Tips: Check Replay (Execution) log carefully. Errors can be there. The widespread reason of script's errors is an absence of correlations.

    Tips: Execute your script with enabled run-time viewer (menu "Tools / General Options.. / Display"). Any shown errors ("Page not found", "Session timeout", etc) indicate about potential correlations.

  2. Find server's response, containing the dynamic value
    Before script executing, please enable extended logging from "Vuser / Run-Time Settings...":
    Then execute script.
    Open Replay (Execution) log and find server's response, which contains dynamic values of TIMESTAMP and CHECKSUM:
    Great! Now we know, where server sends both dynamic values.
    And we found the step, that returns these values. This is 13th line - Action.c (13). Double click the line, containing timstamp's and checksum's values, 13th line of script will be opened:
    web_submit_data("generateChecksum.jsp",     "Action=http://eprumossd0010:8400/RMS/jsp/generateChecksum.jsp",
        "Method=POST",
        "RecContentType=text/html",
        ...
    This means that server's response for generateChecksum.jsp page contains dynamic values which should be correlated.

  3. Capture the dynamic value
    I will show two ways how to capture a dynamic value:
    • Automatic capturing from Tree-view
    • Manual from Script-view
    These ways are similar enough. Also, they use the same function - web_reg_save_param.

    I start from:
    • Automatic capturing from Tree-view.
      Open Tree view (menu "View / Tree view"):
      Then:
      • click "View recording snapshot only" btn (2);
      • select generateChecksum.jsp page from tree view (3);
      • select "Body" to view body of server's response (4).

      As result, you will see recorded values of CHECKSUM and TIMESTAMP (5).

      Now, select value of first dynamic value (checksum), right-click, and select "Create parameter":
      After that you will see the message box:
      You can create parameter for dynamic value.
      If you want to replace all occurrences of dynamic value ("715E19...") in script, press "Yes" btn.
      To not replace all occurrences, press "No" btn.

      Tips: I recommend to not replace all occurrences of dynamic value. It can lead to incorrect results. It's more preferable to replace occurrences one by one with "Search and Replace" dlg.

      OK, I click "No" btn.

      Return to Script-view ("View / Script View") and see changes. There are new lines, inserted before generateChecksum.jsp page:

      // [WCSPARAM WCSParam_Text1 40 715E19300D670ED77773BBF066DAAAE2866484B8] Parameter {WCSParam_Text1} created by Correlation Studio
      web_reg_save_param
      ("WCSParam_Text1",
          "LB=window.parent.setChecksum(\"",
          "RB=\"",
          "Ord=1",
          "RelFrameId=1",
          "Search=Body",
          "IgnoreRedirections=Yes",
          LAST);

      web_reg_save_param function finds and saves a text string from the next server's response. In other words, it captures a dynamic value.

      In this example, web_reg_save_param function will save the captured value into WCSParam_Text1 parameter. The function finds the left boundary (window.parent.setChecksum(") and after that it finds the right boundary ("). The string, found between left and right boundaries, will be saved to WCSParam_Text1 parameter.
      Ord attribute indicates the ordinal position of captured value. In the example (Ord=1), we capture the value between first left boundary and left one.
      Easy to guess, that "Search=Body" means search in a body of server's response.
      I recommend to study Help on web_reg_save_param function. It's very interesting :)

      Note: the capturing of TIMESTAMP parameter is similar. It generates the following code:

      // [WCSPARAM WCSParam_Text2 13 1192177661211] Parameter {WCSParam_Text2} created by Correlation Studio
      web_reg_save_param("WCSParam_Text2",
          "LB=, ",
          "RB=)",
          "Ord=1",
          "RelFrameId=1",
          "Search=Body",
          "IgnoreRedirections=Yes",
          LAST);

    • Manual capturing from Script-view.
      Actually, this method consists in a manual writing of web_reg_save_param function. It requires strong knowledge on this function and its parameters. There are many attributes of web_reg_save_param function, and I do not want to duplicate HP's Help :)

      Tips: I recommend to rename default parameter (WCSParam_Text1, 2, 3, etc) to something sensible. For example, in my example - I would prefer prmCheckSum and prmTimeStamp to WCSParam_Text1 and WCSParam_Text2.

  4. Replace every occurrence of dynamic value in script with the parameter
    This is not difficult step.
    Open "Search and Replace" dlg ("Edit / Replace..."). And replace one-by-one hard-coded values with a parameter.

    Why it is important?
    Imagine, that you have the following code:

    web_submit_data("somepage",
        ...
        "Name=OrderNumber", "Value=125", ENDITEM,
        "Name=UserID", "Value=125",

    If you create parameter for UserID, and perform replacing of all occurrences of its value ("125"), then it will produce the code:

    web_submit_data("somepage",
        ...
        "Name=OrderNumber", "Value={WCSParam_Text1}", ENDITEM,
        "Name=UserID", "Value={WCSParam_Text1}",

    It may be wrong! OrderNumber can be static value and be equal to 125, while UserID may change.

    Now, I assume that you replace all needed occurrences of hard-coded values. We have to perform last step:

  5. Check changes
    After above manipulations, our script will look like:

    web_submit_data("rms.jsp",
        "Action=http://eprumossd0010:8400/RMS/jsp/rms.jsp",
        "Method=POST",
        "RecContentType=text/html",
        "Referer=http://eprumossd0010:8400/RMS/html/testFramework.html",
        "Snapshot=t4.inf",
        "Mode=HTML",
        ITEMDATA,
        "Name=TIMESTAMP", "Value={WCSParam_Text2}", ENDITEM,
        "Name=CHECKSUM", "Value={WCSParam_Text1}", ENDITEM,
        // others parameters ...
        LAST);

    The statement "{WCSParam_Text1}" means "get value of WCSParam_Text1 parameter".
    So, current algorithm is:
    • when server returns different values of CheckSum and TimeStamp
    • then web_submit_data captures and places them into WCSParam_Text1 and WCSParam_Text2 parameters
    • after that we use {WCSParam_Text1} and {WCSParam_Text2} get current values of parameters and use them in scripts

    Let's run our modified script and see results of capturing from server's response:
    These are values, which are sent to a server by a client:

    You can see that dynamic values are saved to parameters and their values are substituted instead of parameters in scripts. Great! We have just correlated our script and it is working now!

    Tips: To get/debug a captured value of parameter, use the following statements:
    lr_output_message("Value of WCSParam_Text1: %s", lr_eval_string("{WCSParam_Text1}"));
    lr_output_message("Value of WCSParam_Text2: %s", lr_eval_string("{WCSParam_Text2}"));

    Execute script again, he result is:


Epilogue:
I hope, I provided simple and understandable explanation of LoadRunner correlation.
Please, share your comments and thoughts, dear readers.

Do you have ideas for further topics - welcome :)

Dmitry Motevich,
QA / Automated testing specialist


Related articles:

How to automatically create custom HTML report in LoadRunner Analysis from command line?


Introductory words about LoadRunner Analysis HTML reports:

I like watching on how my LoadRunner scripts work without my intervention. The plan is simple:
  • I start LoadRunner Controller from command line
  • Controller performs load testing
  • After Controller finishes, it opens Analysis
  • LoadRunner Analysis analyses :) and interprets results of load tests
  • I create and export customized HTML report

Default HTML report looks like the following one:


The task I faced:

After Analysis completed working, custom HTML report should be created and exported automatically and be sent with email. After that, next load test can be started from bat-file. So, there are no any pauses for tester's intervention should be.

My custom HTML report should contain new graph - "Windows Resources". Also, several default pages should be removed - "Running Vusers", "Throughput", and "Transaction Summary". So, new HTML report should look like:

And the main condition is:
  • this custom report should be generated automatically every time I started my production LoadRunner scripts


How I created custom reports before:

Actually, any custom report can be created manually... I added manually new graph ("Windows Resources"), deleted unnecessary pages, generated HTML report, saved it, attached to email and sent it.


Why I had to automate the creation of reports:

Above process requires tester's time (= mine). I'm lazy man and don't like wasting my time for such routine actions.

Another important reason to generate these custom reports automatically is that I created something like a framework, which:
  1. restarts test server
  2. configures and starts services of my application to be tested
  3. starts LoadRunner tests
  4. performs load testing
  5. gathers and analyses results from automated tests
  6. creates custom reports
  7. attaches these reports to email and send to appropriate addressees
  8. repeats the above actions for next automated LoadRunner test
I plan to share this framework in the nearest future, if anyone asks it :)


Well, let's start working on the current topic...

I will show how to edit a default report and save it as a template. After that, we will learn how to start LR Analisys from command line and how to work with a saved template.


How to create custom report:

I recommend to customize a default report and save it as a template.
To delete "Running Vusers", "Throughput", and "Transaction Summary" pages, select them in Session Explorer, right-click and select "Delete Item":

The new graph ("Windows Resources") adding is also intuitive. Just right-click on "Graphs" item and select "Add New Item / Add New Graph":

After that you can select new graph to added. In my case, I selected "Windows Resources" graph:
Note: if you want to add "Windows Resources" graph, it must be added to LR Controller. Please, read my previous post to see how add and process "Windows Resources" graph:
How to detect memory leaks with LoadRunner - visual tutorial

After that I rearrange the current list of graphs. For that just drag any item (graph) and drop it to required place. It's easy, really :)
After these manipulations, the list will be the same I wished:

Great! The finish is not far :)
Now I select menu "Reports / HTML Reprot..." and get the report I dreamt :)


The next step is saving of the current report as a template:


Select menu item "Tools / Templates / Save As Template...".
As a result, "Save As Template" dlg will be shown:
I perform the following:
  • Uncheck "Automatically apply this template to a new session" checkbox.
    This will allow to load default template when I start LoadRunner Analysis. Unchecked option suits me.
  • Check "Generate the following automatic HTML report" checkbox.
    If checked, the HTML report will be generated automatically. This is what I need.
  • Check "Automatically save the session as" checkbox.
    It should be checked to correctly automatically close Analysis.
  • Check "Automatically close Analysis after saving session" checkbox.
    I recommend to enable this option. It will be irreplaceable, if you plan a batch processing - that's our case.
So, prepared "Save As Template" dialog is shown on the screen shot:
Click OK btn to save new template.
Close LoadRunner Analysis. Now we are ready to perform last action.


Start LoadRunner Analysis from command line:
  • To start only Analysys, execute the following command:
    path_to_AnalysisUI.exe
  • To open *.lrr file (LoadRunner result file) or *.lra file (LoadRunner Analysis file), execute:
    path_to_AnalysisUI.exe -RESULTPATH path_to_lrr_or_lra_file
  • To open *.lrr or *.lra file and apply a specified template, execute:
    path_to_AnalysisUI.exe -RESULTPATH path_to_lrr_or_lra_file -TEMPLATENAME name_of_template
There is an example for my template ("WinResTemplate"):
"c:\Program Files\Mercury\LoadRunner\bin\AnalysisUI.exe" -RESULTPATH C:\Temp\30users\30users.lrr -TEMPLATENAME WinResTemplate

Tips on the example:

  1. Since path to AnalysisUI.exe contains spaces, use quotes (")
  2. You have to specify name of template, not path!

That's all!
Execute the example command from command line.
You will see that:
  1. Analysis will be loaded
  2. It will start processing lrr-file, which was produced by LoadRunner Controller.
  3. After it precesses lrr-file, Analysis will apply template. That means, needed graphs only will be created. We have specified these graphs above.
  4. Analysis will create HTML report
  5. HTML report will be saved in specified path (I used - %ResultDir%\Windows_Resources_Report.html)
  6. At the end, Analysis will be closed.

So, custom HTML report is ready without tester's intervention! Next LoadRunner test can be started from command line.

--
Dmitry Motevich,
living in LoadRunner-city :)